The Japanese artists have a special technique called Toriki which is used to propagate trees; we call it air layering bonsai. Basically, you block the flow of nutrients along the tree so that it is forced to establish new roots. It’s one of the top methods used for specific species, especially when you want to plant a separate bonsai.
In this article, we’ll show you how to air layer a bonsai, how it works, and how to care for the new tree. We’ll also provide some general guidelines to enhance your knowledge on the topic before you proceed.
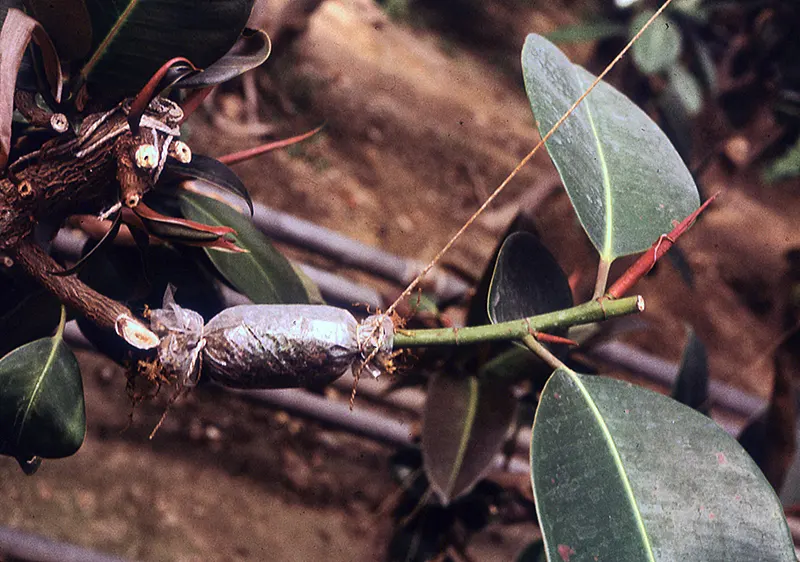
Image courtesy of Mike | License Details
One of the top methods for propagating a bonsai is air layering, but that’s not the only reason it’s used. For one, your beautiful tree may be too tall, but you don’t want to lose the crown and foliage you’ve developed. You can use this technique to shorten the trunk while keeping the upper part.
Another reason for air layering bonsai is if there are bad roots on the parent tree. Root rot can be devastating for a small tree, so you should develop new roots on your bonsai. You can form them higher up outside the infected soil, giving you a chance to try again.
Finally, air layering is useful if the bonsai has malformations along the trunk that make it look hideous or don’t conform to the style you were planning. You’ll then use this technique to separate the part you want from the bad section. It also helps if there are diseases on the lower parts of the tree.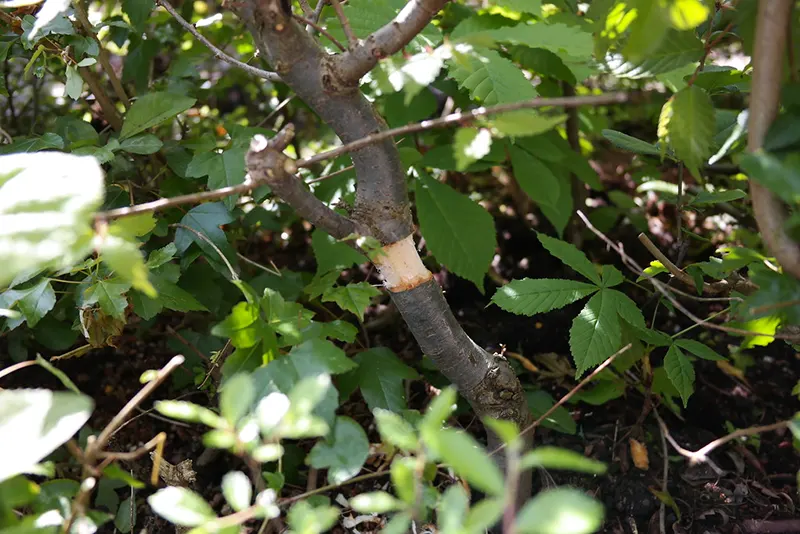
Image courtesy of Jerry Norbury | License Details
Creating the air layering space on your bonsai is only phase one. If you want to successfully see new roots, you need to care for the area while also looking after your tree as a whole. Here are some factors you need to keep in mind:
- Moisture: Since you’ve cut off the main supply of water, you’ll need to supply it. You’ll need to keep the moss moist so that the upper stem still has a way to drink. Find a way to do it without opening the plastic covering, such as using a syringe to supply it through an opening.
- Time to grow: It will take a few months for sufficient roots to grow to keep your new bonsai alive. Don’t be impatient and check every day or week for signs of new growth. The less you disturb the opening, the better.
- Removing the new tree: When you have a healthy amount of roots among the moss, you can remove the upper part from the rest of the bonsai. Cut just under the new roots, making sure not to damage them. Also, don’t unsettle them or remove the moss.
- Plant in soil: With the roots and moss in place, put them in new soil in your bonsai pot. Surround the roots with a standard mix of bonsai soil that should have all the nutrients it needs for the first year. You can read our extensive bonsai tree care guide for more details on how to care for it.
- Elemental forces: Whether still air layering the bonsai or after removing the new tree, you need to shield it from heavy rain, wind, and low temperatures. Since you’ll perform this technique in spring, you’ll probably have new roots just before autumn arrives. Keep it inside your home until the next spring arrives.
- Resting period: Don’t fiddle with the new bonsai tree too much after planting it in soil. It needs time to rest and recover from the stress you caused. The same applies to the parent tree, which needs time to rest until the next spring.
- Fertilizer: If you bought new bonsai soil, it should already have enough nutrients until the next spring. If you’re not sure, you can supply slow-release fertilizer in the summer as soon as you plant it in the soil. Should it be autumn or winter, rather leave the feeding until spring.
While the above information should be enough to teach you about air layering bonsai, we want to make sure that you have all the bases covered. There’s still a bit more to know about this process, even if you’re just curious. Let’s look at a few questions you may need to be answered. You can also contact us if there’s anything you still want to know.
Why a Bonsai Tree Forms New Roots During Air Layering
To understand why a tree grows new roots during air layering, we need to get a bit scientific. There are two conduit systems that transfer items from the roots to the upper structure. The Xylem is deep in the wood, transporting water and minerals. Between the wood and bark is the Phloem, which transports essential sugars that are formed during photosynthesis.
Usually, the sugars are formed when the leaves absorb the sunlight. The stem then transports these sugars to the lower sections and roots. However, you’ve now cut off this vessel, so it will only transport the food to the cut space. It will now develop new roots from the sugars while absorbing moisture from the moss.
Is Air Layering Used as a Style?
Air layering on a bonsai is predominantly used for propagation, giving life to a new bonsai so that you don’t have to buy more. Plus, it retains the bloodline of the parent tree. However, it’s also used for styling, especially where malformations occur.
Let’s make an example. You have a wonderful, strong Juniper bonsai tree with several trunks and decent foliage. However, you’ve seen what a cascade bonsai looks like and want to emulate the style, but you don’t want to lose the stem you’re going to remove. You’re worried the cutting won’t take, so you can air layer the section until roots form and remove it layer. The remaining branch can cascade over the pot.
Forming a deadwood bonsai is another example. It seems like such a waste to let a beautiful stem go to waste when you want to remove it for the deadwood appearance. Instead, you can air layer the section you plan to remove, making a new bonsai from it instead. These are just a few examples of making new styles with this technique.
How Long Does It Take For Air Layering To Root?
It depends on the bonsai species you’re growing. The air layering can take around six to ten weeks to form new roots, and that’s only if you did it right. Slow-growing trees can take longer, even up to six months or the next spring. Just because you don’t see roots doesn’t mean the process wasn’t successful.
It’s essential to check that the bark and Phloem haven’t grown back. Once these elements are back in play, the air layering bonsai won’t have the need to develop new roots. When you do your checks, keep an eye on the wound healing.
What Is The Best Time For Air Layering?
Spring is usually when trees form new roots, leaves, bark, and other essential structural elements. That’s when you need to start the air layering process on your bonsai. It’s the best chance you have to see new roots by the time summer is almost at its end.
This season is also when the bark is more supple and easier to remove. The tree absorbs more moisture, which is why the moss will be so successful in supplying liquid, and the sugars form during photosynthesis. You’ll need to let the bonsai have as much direct sunlight as possible for the best success.
What Is The Success Rate Of Air Layering?
When done correctly, the success rate of air layering is about 80% to 90%. It has a higher success rate than cuttings and seeds in most species, as it has the nutrients it needs to survive. Also, if you fail, the bark simply grows back. Failure with cuttings and seeds usually means death.
If air layering fails, it’s usually because the bark and Phloem weren’t correctly removed or the moss isn’t supplying the nutrients as it should. It can also be caused by interfering with the section too much and disturbing the root formation process.
Advantages And Disadvantages Of Air Layering Bonsai
While air layering bonsai sounds promising, there are some pros and cons of this method, specifically as they apply to bonsai trees. Here are some examples:
Pros
- One of the more successful propagation methods
- Easy to perform and hard to get wrong
- Almost no skill is required
- Can grow several bonsai at once
- Creates a fully developed bonsai
- Mature bonsais will almost fruit immediately the next season
Cons
- Long waiting period for roots to form
- Air layering causes stress on the parent bonsai
- Bigger stems need more attention
- Air layering may lead to a shorter lifespan than seed propagation
What Is Better: Grafting Or Air Layering?
To answer which is better, grafting or air layering, it helps to understand the chief difference between them. Air layering supplies a bonsai with the same traits as the parent. So, if you want exactly the same tree in your bonsai area with the same DNA, then this method is the best option.
When it comes to grafting, you have two different types of bonsai trees where you’re trying to encourage different traits or characteristics. The scion will not have the same DNA as the parent, which is the main objective of the propagation technique. Air layering doesn’t have the same effect. So, it all depends on your purpose.
Can You Air Layer All Trees?
Most bonsai trees can be air layered, but the question is whether or not you should. Many deciduous and fruit trees grow quickly, which means you won’t wait long to see new roots and leaves form, which is great. Some examples include the Chinese Elm, Azalea, Recurve Ligustrum, and Japanese Maple.
You can also air layer conifer and evergreen bonsais, but many of them develop slower. That means you’ll wait much longer to see roots appear, maybe even twice as long. Examples of these trees include Japanese Yew, Italian Cypress, and Norfolk Island Pine.
What Can I Use Instead Of Sphagnum Moss For Air Layering?
While sphagnum moss is the most popular medium for air layering bonsai, it isn’t the only one. We know it isn’t readily available everywhere, which means you’ll need to look at a few alternatives. We recommend sawdust, coconut fiber, or coir. You can also ask your local plant store for a suitable replacement.