Bonsai wiring has become synonymous with the art of creating miniature trees. While it is possible to grow and train bonsai without wiring, it remains one of the fastest and most effective ways to train certain bonsai species. However, not all tree species can be wired, and there are certain rules to the practice that should be followed so that you don’t harm your tree.
In this article, we’ll be taking a deeper look at bonsai wiring. It includes why we wire bonsai, when we wire, and how to wire bonsai. We’ll also be sharing a few wiring tips, so keep reading if you want to learn about wiring.
Why Do We Wire A Bonsai?
The main reason for wiring bonsai is to change the tree’s shape. Wiring can be applied to the trunk (if the bonsai is still young enough) or to the branches. As bonsai artists, we have little control over how a tree’s branches develop. Sometimes the branches will grow at an odd angle, such as straight-up, intersecting the trunk, or growing perpendicular with the main branch.
We don’t always want to lose an entire branch because it’s growing a little funny. That’s where wiring becomes your best friend, as it allows you to ‘correct’ the branch without removing it.
There are a few ways that wire can be used on a tree, such as:
- Adding movement to the trunk by bending the trunk
- Reshape the branches to enhance the look
- Used to anchor the tree into the pot and keep it from moving around
- Used to keep the dirt screens secured over the drainage holes
- It can be used strategically to thicken the trunk or certain branches
When Should I Wire My Bonsai?
For the most part, wiring can be applied at any time of the year. However, if you’re looking for the absolute best time, it would be early Spring. This is because deciduous trees would be without leaves, making wiring your bonsai much easier. It is important to note that if you wire your tree in early Spring or during the growing season, you have to watch the wiring carefully to avoid wire bite.
During Spring, the branches will thicken to accommodate the extra flow of sap, and if you haven’t been watching your bonsai, the wire could cut deep into the branches or trunk, and if it’s not noticed in time can cause scarring and even death to the branch.
Many experts also recommend wiring your bonsai in winter. While this is perfectly safe for individuals with experience in wiring, it’s not the best option for beginners. During the wiring process, you’re essentially bending the branches into a new position. This causes small breaks in the branch itself. These can usually heal, but if the branch is bent too much, especially during winter when resources are conserved, the branch can die.
Tools Needed To Wire A Bonsai
What is a workman without his tools, right? The same applies to wiring your bonsai. There are certain tools you need to get the job done. The tools needed for wiring are:
- Copper or Aluminum wire
- Bonsai wire cutters
- Raffia (optional)
- Branch jack/wire stays (optional)
Copper or Aluminum Wire
When choosing what wire to you on your bonsai, your best options are either Copper or Aluminum. Aluminum wire is great for beginners as it’s easier to work with. It’s also very soft, making it the ideal wire to use on trees with soft bark such as maples, olives, and elms. The hold of aluminum wire isn’t as strong as copper, so you might experience some bounce back when removing the wire. You may need to re-wire if you don’t get the exact position you want after removing the wire.
On the other hand, copper is much stronger and usually holds its shape well with little bounce back. However, since it’s harder, it can be more difficult to work with. It is ideal for use on trees with harder bark, such as conifers. Bonsai going to exhibitions can also be submitted with copper wire.
What size wire to use?
The thicker the branch or trunk that you want to wire, the thicker wire should be used. A good rule of thumb is to use wire as thick as ⅓ the diameter of the trunk or branch being wired. However, you may find that certain species, especially those with harder wood and bark, may need slightly thicker wire to keep it in position. In this case, you can add a second wire following the first one to give it enough strength to hold the branch in the ideal position.
Bonsai Wire Cutters
Bonsai wire cutters are specially developed to remove the wire from trees without damaging the bark. These cutters have a stubby edge to prevent cutting into the branch when removing wires. It also has more metal at the cutting edge to remove the wire without breaking off the tip of your cutters. Finally, the pivot point is closer to the cutting edge, meaning you can make more cuts without tiring.
Raffia (Optional)
Raffia is often used to wrap a thick trunk or branch before wiring it. Because the trunk or branch is so thick, it’ll be difficult to just use wire, which is where the raffia comes in as it protects the trunk or branch from the extra force exerted by using wire and other tools such as branch jacks or wire stays.
Branch Jack/ Wire Stays
These are specially developed tools specifically to help bend stronger trunks and branches. These are optional tools to use and not a requirement. It’s also a good idea to only use these tools once you’ve gained some experience with correctly wiring a tree. These amplify the strength exerted when bending a trunk or thick branch.

The Right Way To Wire Your Bonsai
Now that we understand a bit more about what wiring is and the tools needed, we can move on to the technique of wiring.
Step 1: Decide Which Branches Need To Be Wired
Carefully look at your tree and decide which branches you want to wire. Bear in mind then that when we wire branches, it’s preferable to use a single length of wire to wire two branches, wrapping around the trunk twice for stability. This is known as the two-branch principle. In some cases, you may only want to wire a single branch, which is also possible. It’s usually a good idea to work from the bottom upward.
Step 2: Pair Them Up For the Best Result
Implementing the two-branch principle often yields the best results because the wire is anchored solidly, meaning the branch won’t move from its position. It’s also more aesthetically pleasing than just wiring a single branch. Ensure that the two branches are located close to one another on the trunk.
Step 3: Cut A Length Of Wire
Now that we know which branches we’ll be the wiring, we can cut a length of wire. Roughly measure the wire against the branches from the starting tip to the ending tip. Always add more wire (about ½ of the length extra) because you’ll be wrapping it around the branches. As you get more experience with wiring, you’ll soon be able to cut the perfect length of wire without any wastage.
Step 4: Start Wiring
Now you’re ready to start wiring. Start by anchoring your wire to the trunk. This means wrapping the middle section of the wire around the trunk at least once, preferably twice, at a 45° angle. This is your anchor point.
Now you can start wiring the branch, starting from the lowest one and wrapping the wire around the branch maintaining the 45° angle as you go. You want the wire to be against the branch (enough to slide a piece of paper between the wire and branch) with no visible gaps. Areas with gaps will have to be overexerted for the branch to maintain its shape. This overexertion can lead to snapping the branch, so it’s best to avoid gaps.
Be smart and use the wire to your advantage. For example, if you want to bend a branch downwards, make sure the wire from the trunk comes into the branch from below to exert more downward force. Alternatively, if you want to wire a branch upwards, ensure the wire comes onto the branch from above.
If you have a single branch to wire, you’ll still create an anchor on the trunk. In the case of wiring a single branch, you’ll have to wrap your anchor around the trunk at least twice to provide the necessary stability to keep the branch in place.
Once everything has been wired, you need to leave the wires in that position for four to six weeks. You’ll need to keep a close eye on the wires and remove them, and re-wire them if they become too tight. This is important to avoid wire bite that can cause unsightly scarring or even kill the tree.
Other Wiring Tips
Now that we understand the basics of wiring a bonsai, here are some extra tips that could be useful when you start training your bonsai using the wiring method.
Never Cross Your Wires
Criss-crossing your wires will create a pressure point that is sure to leave damage on the bark. As such, you should never cross your wires. Instead, wrap your wires following the same fluid movement.
Never Wire Leaves To The Trunk
If you’re wiring a tree that still has a lot of foliage, it can sometimes happen that a leaf gets trapped between the wire and the branch. While it may be tempting to leave it as is, this can damage the leaf buds and lead to malformations in future leaves.
Check Your Wire Weekly
Don’t make the mistake of thinking that once your tree’s been wired, you can just leave it for four to six weeks. The wiring must be checked frequently to ensure it’s not getting too tight around the branch or digging into the bark.
Don’t Reuse Wire
It is technically possible to reuse wire you’ve taken off of a bonsai, but it’s not recommended. While it may seem like a worthwhile cost-saving exercise, trying to keep your old wire to reuse it can be risky. We don’t suggest reusing old wire on your bonsai, especially if you’re just starting out. By unwrapping the wire rather than cutting it off, you risk damaging or snapping the branch entirely. This is especially true when using copper wire that becomes stiff after being bent, so it’s much harder to unwind.
Wire Bite Can Be Useful in Certain Species
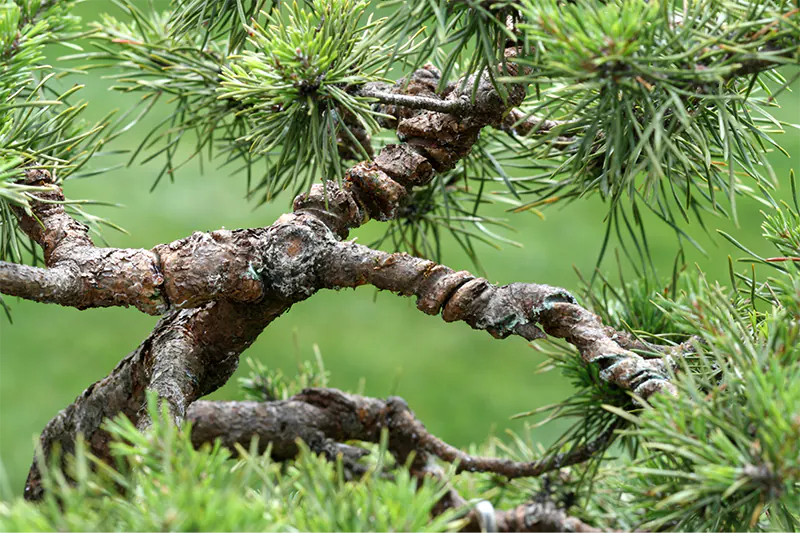
There are a few species where wire bite can be used to intentionally scar the tree in order to give the trunk more character and an older look and feel. However, it should only be done once you’ve got enough experience with wiring bonsai, as it is difficult to know when the wire bite is enough, and the wire can be removed. In pines, wire bite can be used to speed up the thickening of the branch. In junipers, wire bite can be used to alter the sap flow of the tree and once healed, the tissue between the wires can be removed to create shari (deadwood on the trunk of a bonsai).

Final Thoughts
Wiring can be an extremely rewarding and necessary skill when it comes to training bonsai. However, it can also be challenging to master. With enough practice and knowing what to look out for, you can quickly start wiring your bonsai to improve their shape and look. With enough experience in wiring, you can also start using it to create more visual interest by thinking of trunks, creating a knotted look or even creating impressive shari on the trunk.
Be sure to see our guide on how to wire a Chinese Elm bonsai.