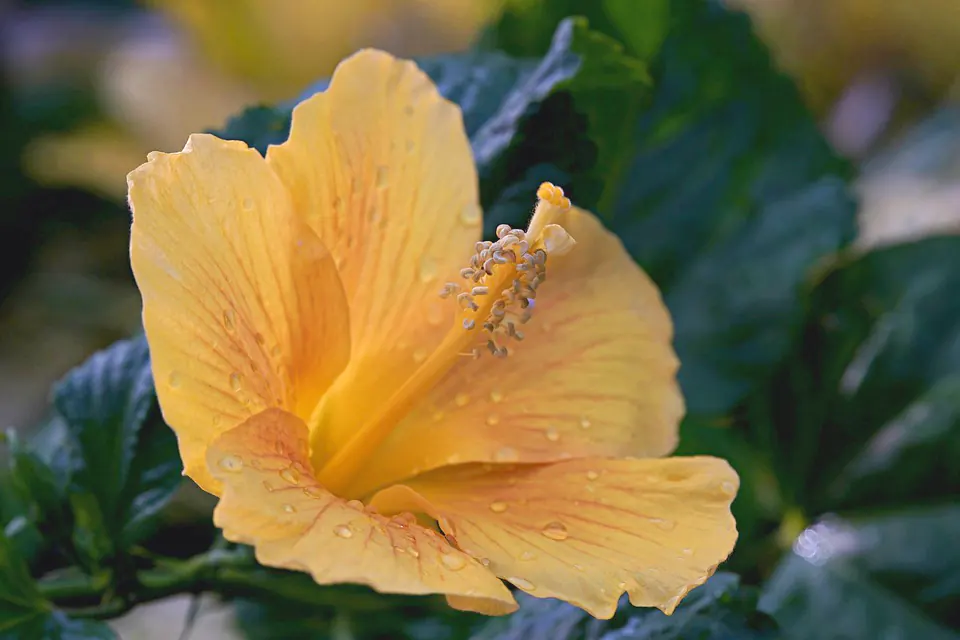
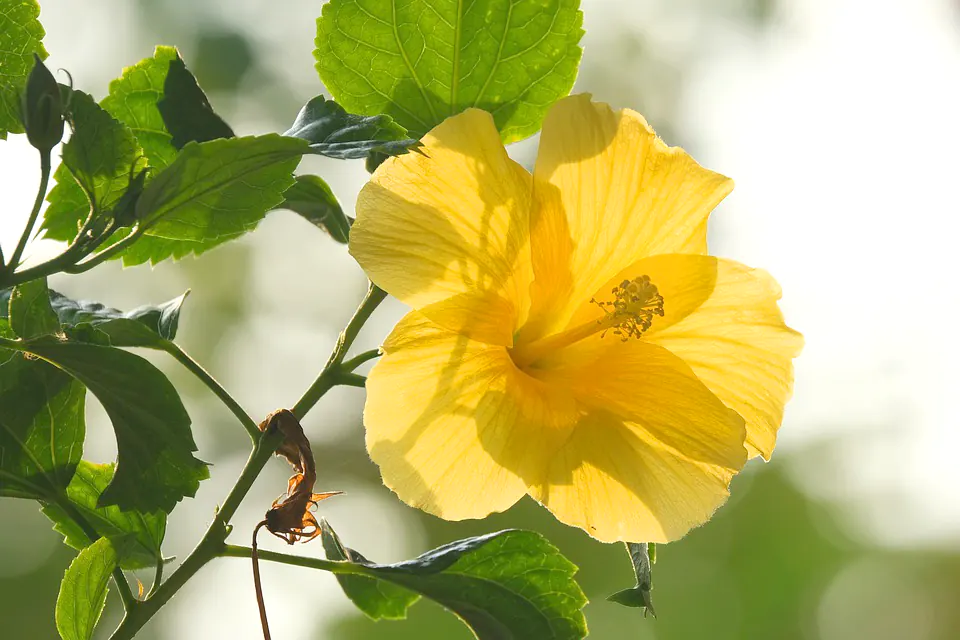
There are few floral plants more spectacular than Hibiscus. Its signature long slender pollen tube capped with an intricate stigma is enough to impress any garden lover. All this without even mentioning the massive petals in an almost staggered and overlapping pentamerous arrangement. Hibiscus is a true showpiece any garden would benefit significantly from. But there are more species of Hibiscus than the classic large format flower featured on beach shorts and various Hawaiian paraphernalia.
Hibiscus aethiopicus is a smaller flower than most envision when they hear the name. But it is still a stunning pentamerous bloom. Why not add pentamerous to your flower vocabulary if it isn’t already there? It’s merely a much shorter way of saying a flower has five petals. But words of the like do inject a certain amount of romance into flower descriptions, something I appreciate immensely as a Bonsai Alchemist. The words we use are magic. They can inspire and enthrall, and they infuse our message with power and conviction.
This particular pentamerous bloom shares many attributes with its more famous cousin, Hibiscus rosa-sinesis. Included in these shared attributes are its overall aesthetic properties. This small flower looks as though it was made by hand by a master seamstress using the finest silk with a soft plissé finish. Even in its modest size and lighter colors, hibiscus aethiopicus is a magnificent blossom. Its already small proportions mean it’s actually the perfect Hibiscus to nurture into a beautiful bonsai.
Let’s dive into how to make sure your hibiscus aethiopicus thrives.
- Clade: Eudicots
- Order: Malvales
- Family: Malvaceae
- Genus: Hibiscus
- Species: Aethiopicus
This is the beginning of the care guide’s main body. This is the place where we get much more in-depth and specific about how to care for Hibiscus aethiopicus. Hibiscus is a fairly easy plant to grow overall.
Hibiscus aethiopicus, in particular, grows abundantly in the grasslands of Southern and Tropical Africa. Grasslands are known for being dryer than other habitats and ecological regions. The soil here is primarily sandy and doesn’t contain much in the way of moisture due to limited rainfall in these regions.
These dry surroundings are where hibiscus aethiopicus has adapted to thrive. The best way to ensure the survival of your own hibiscus aethiopicus is to replicate its native environment as best as you can. So let’s dig into the finer points of what this beautiful small species of Hibiscus needs to thrive.
Native Area
This species of Hibiscus is native to the grasslands of tropical and Southern Africa. Relying upon the intense heat of the untamed sun, hibiscus aethiopicus is also found in abundance in the semi-arid landscapes of Eritrea and Yemen.
Growth Pattern
Hibiscus aethiopicus is also known as a dwarf wild species of Hibiscus. The dwarf part of the name comes from the way in which hibiscus aethiopicus grows naturally; it is a prostrate herbaceous plant. Prostrate means hibiscus aethiopicus grows along the ground like many groundcover flower species and herbs. This is very different from the upwardly growing species that dominate the world of Hibiscus.
Because of its natural growth pattern, Hibiscus aethiopicus is perfect to use as a ground cover and will break up bland patches of soil very well. Even though they naturally grow along the ground, Hibiscus aethiopicus is easy to train upwards and will make a gorgeous bonsai with its modest but magnificent blooms.
Optimal Soil
Hibiscus aethiopicus blooms naturally in the temperate and tropical grasslands of Africa, also being a fairly common sighting in Yemen and Eritrea. Grassland is a term used to describe a biome that is too wet to be a desert and too dry for the vegetation usually found in a forest.
The soil in grasslands is incredibly fertile, something you wouldn’t expect from looking at this often flat, gold-dusted landscape. Hibiscus aethiopicus is a much smaller plant than its larger cousins like rosa-sinesis and thrives in the fertile undergrowth of these grassland biomes. Grasslands are sometimes mistaken for savannas. However, the two biomes are similar in soil composition and climates, often blending seamlessly into one another under warm African skies.
The critical difference between grasslands and savannas is that savannas have trees, while grasslands are flat. Savannas are also highly popularized as the epitome of the African landscape and are thus instantly recognizable with their signature acacia and baobab trees. Due to the similarities in the soil composition and undergrowth, if you can call to mind the image of a savanna, you can visualize the staggering serene beauty of the grasslands, minus the trees, of course.
These characteristically arid-looking landscapes look as though they can’t possibly support much life. But the tall golden grasses hide a world of fertile soil teeming with life and diversity. The richness of the soil comes primarily from the dense blanket of long grass roots that are constantly dying off, decomposing, and serving as nutrients for new growth. This grassland circle of life means that the soil is highly fertile and capable of supporting a vast selection of smaller shrubs, like the star of this care guide, hibiscus aethiopicus.
Grassland soil typically has a pH of 6.3 and above. The soil under grasslands also drains very well but holds some water in reserve for extended periods without rainfall. Soils that trap water or become waterlogged are not suitable for hibiscus aethiopicus, and they tend to thrive even in soils drier than what you’d find in the grasslands. The presence of higher levels of nitrogen in the soil is crucial if you’re growing hibiscus aethiopicus and can determine how green and dense your foliage is. We’ll go deeper into nitrogen in the fertilization section.
Watering
True to the grassland landscape this species calls home, hibiscus aethiopicus doesn’t need a lot of water to survive and even thrive. These plants are built to be drought-resistant and make do with the most minuscule amounts of water spaced relatively far apart. The infrequent rains that occur in the grasslands and savannas are not enough for the larger hibiscus species, but this dwarf species thrives in such conditions.
Replicating these semi-dry conditions is integral to ensuring your plant’s survival. To do this effectively, we recommend watering your hibiscus aethiopicus with around 1-2 inches of water every week. For new plants, you’ll want to do this more often while the plant establishes itself. We suggest giving newly planted hibiscus aethiopicus 2 inches of water every other day. If the weather is particularly hot and dry, you’ll need to adjust your watering schedule.
Remember, while hibiscus aethiopicus is native to the grassland, it will adapt to growing in whatever climate your garden is in. While we can go to incredible lengths to replicate other biomes in our gardens, we can only go so far. There are notable differences in the humidity levels in the air, the organisms in the ground, and the quality of the water that may have an impact on how well your Hibiscus grows in your garden.
We’d suggest 2 inches of water every second day in the case of very dry weather or scorching hot days.
Light and Location
Hibiscus aethiopicus is a species hardened in the sun-drenched conditions of grasslands and savannas. Therefore, it thieves marvelously in hot weather. You’ll want to plant your hibiscus aethiopicus in full sun. If you are growing a hibiscus aethiopicus bonsai, give the miniature tree enough hours to bask in the sunlight each day. Place your bonsai either on a sunny window sill or in a sunny spot on your balcony, porch, deck, or paving.
Hibiscus aethiopicus will still grow in partially shady conditions, but its flowers bloom better when fully immersed in the sunlight. Because it was likely not plucked directly from an African savanna or grassland, your hibiscus aethiopicus might need some shade during the hottest part of the day if you live in a very hot place. This will be around noon. In the case of incredibly high daytime temperatures, you might consider planting your hibiscus aethiopicus in the back of one of your perennial flower beds.
Fertilizing
Crops are fed fertilizer to increase their strength, production, and beauty. Three essential compounds must be present to grow hibiscus aethiopicus and produce the gorgeous pentamerous flowers that we love. Phosphorus, nitrogen, and potassium are these three important elements. These three nutrients are present in the soil, but factors like human intervention have changed the density of their presence. Therefore we need to add more of them into our plants’ soil so that they can thrive.
There is a need for fertilizer because we want plants that grow more rapidly, are more resistant to critters and weather conditions, and produce more flowers and fruits, increasing their value to us exponentially.
Nitrogen
For healthy plant growth, nitrogen is widely regarded as an essential component. Nitrogen, which occurs in fertile soil, provides plants with the energy they need to remain alive. Plants’ green color is also attributed to nitrogen, which is a component of chlorophyll.
A plant uses photosynthesis to turn essential components such as carbon dioxide and water into starches and sugars it can use to grow. Beauteous hibiscus aethiopicus leaves absorb all the sunlight they need to thrive and manufacture all their nutrients. Photosynthesis can literally be translated as ‘the act of making things from light.’
Chlorosis is a symptom of nitrogen deficiency in plants, which appears as yellowing of the leaves. A deficiency in nitrogen will cause any nitrogen to be directed towards younger growth, which will leave older parts of the hibiscus aethiopicus plant starved of the vital nutrient.
Plant protoplasm also depends on nitrogen. This is the translucent matter within the plant’s cells that contains all its biological functions. Flower differentiation depends on protoplasm, which also increases plant growth speed and overall vigor. Additionally, protoplasm catalyzes mineral and biochemical reactions within the plant.
Green shrubbery typically grows well with nitrogen, but flower production can suffer if nitrogen levels are too high for your hibiscus aethiopicus.
Phosphorus
Phosphorus is integral to the survival of your hibiscus aethiopicus, but in smaller quantities than nitrogen and potassium. There are three main reasons that phosphorus is vital to plant health:
- Photosynthesis depends on it to convert sunlight into usable energy, sugars, and starches.
- Through adenosine triphosphate (ATP), phosphorus is essential to plant respiration and energy transfer.
- Plant RNA and DNA, otherwise known as ribonucleic and deoxyribonucleic acids, contain phosphorus as part of their core biological makeup.
Because of its presence in core genetic material like DNA and RNA, phosphorus is integral not only to your hibiscus’ survival but also to its reproduction cycle. Without a healthy presence of phosphorus in its soil, your hibiscus aethiopicus likely won’t be able to carry its genetic material and adaptations over to the next generation. This means any future hibiscus aethiopicus from that mother plant might lack the survival skills your specific plant has had to develop in your garden.
Phosphorus is also essential to the plant’s overall lifecycle. The phosphorus in your Hibiscus will be returned to the soil when it dies, where it can be used by microorganisms and other plants to sustain their own life cycles. You could call this the phosphoric circle of life.
Potassium
The third essential nutrient is potassium. Potassium plays a critical role in transporting other nutrients from the roots to the various parts of your Hibiscus aethiopicus’s organic structure. Plants can also use this wonder drug to activate a wide range of enzymes that are integral to their own specific functions.
The plant’s stomata are regulated by potassium, which controls how much carbon dioxide it absorbs. This process enhances the effectiveness of the plant’s photosynthetic processes.
Your hibiscus aethiopicus won’t be able to thrive without these three essential nutrients. This is why hibiscus fertilizer usually has the letters N, P, and K on its container. They stand for nitrogen, phosphorus, and potassium.
Best Time to Fertilize your HIbiscus Aethiopicus
With any plant, you want to fertilize when the plant is in an active growing phase. Hibiscus aethiopicus is no different. Keep track of when your plant typically starts developing new growth and when it seems to slow down or cease growing for a while. You’ll want to apply fertilizer when you see fresh shoots or new leaves on your plant.
Fertilizing during dormant phases will do a lot of harm to your Hibiscus. Fertilizer is specially formulated to support growth, not necessarily encourage it if it isn’t already happening. The nutrients in fertilizer can burn the roots of your hibiscus aethiopicus and even damage its foliage severely if applied during the dormant season.
When to Fertilize Hibiscus Aethiopicus
Hibiscus aethiopicus doesn’t like to be overloaded with fertilizer. It’s best to feed your plant small amounts more often than large amounts less frequently. The best way to do this is to fertilize with half the recommended dose every time you water. So along with the 1-2 inches of water a week, you’ll want to apply half the recommended dose of fertilizer.
The Best Type of Fertilizer for Hibiscus Aethiopicus
As we highlighted above, hibiscus aethiopicus thrives on higher amounts of nitrogen and potassium and lower amounts of phosphorus. Experts in the field of successfully cultivating hibiscus aethiopicus recommend a fertilizer setup of 3 -1 -4. This will be a moderate amount of nitrogen, a small amount of phosphorus, and a high amount of potassium.
You could opt for a 4 -1 -4 ratio, but as nitrogen favors the development of foliage for photosynthesis over flowers for reproduction, any increase in nitrogen might impact the density of your hibiscus aethiopicus flower production.
Propagation Methods
There are two main ways that you can propagate hibiscus aethiopicus; Either root cuttings or stem cuttings. Most people favor stem cuttings when they propagate their hibiscus plants. This is because stem cuttings will grow to be an exact copy of the parent plant due to identical genetic material. So if you have a specific hibiscus aethiopicus plant you’d like to duplicate, stem cuttings are the way to go.
Root cuttings are better for more dense flower production and fuller foliage. Root cuttings and stem cuttings differ in their rooting requirements. We’ll cover both methods below.
Stem Cuttings
You should always harvest your cuttings from new growth or what we call softwood. Softwood branches on the hibiscus aethiopicus are those that have not yet fully matured. This means that the branches are still pliable and have a green appearance. The best time to harvest softwood cuttings from your hibiscus aethiopicus is during spring or early in the summer months.
Your hibiscus cuttings should be around 4-6 inches in length; this is 10-15 cm. You’ll want to remove all of the leaves apart from those at the very top of the cutting. This is standard practice, but not everyone tells you why. We remove the leaves because if we don’t, these will take up nutrients that we’d prefer to be directed into the development of a strong root system.
The bottom of the hibiscus aethiopicus cutting should be cut at an angle just below one of the bottom nodes. Nodes are the little bumps where the leaves were growing. Typically roots develop from these lower nodes, as well as from the angled piece you cut at the bottom of the cutting. Dip the bottom of your cutting in rooting hormone. If you don’t have rooting hormone, ground cinnamon usually works quite well.
This isn’t an essential step; I’ve had success without rooting hormone and failures with it. Sometimes getting plants to root properly is a luck of the draw-type of situation. For this reason, we usually take more than one cutting to ensure that you have an adequately rooted plant at the end of the day, even if you have a few stragglers or failures.
Next, you’ll want to place your hibiscus aethiopicus cutting into a pot for rooting. Your pot needs to be big enough to contain the roots your plant will develop without getting rootbound. The ideal soil mix for rooting your cuttings is a 50 -50 ratio of potting soil to perlite. You’ll want to keep the soil slightly moist, but not completely wet or drenched,
Place a plastic bag over the pot making sure the bag doesn’t touch the leaves. This creates a little closed ecosystem for your hibiscus aethiopicus to root in. Place your pot in partial shade. You shouldn’t need to give the plant more water while it roots; the closed system is designed to leverage moisture cycles like evaporation to keep the soil moist. If you notice it looking dry, moisten the soil again.
Your cuttings should be rooted within about eight weeks. Once rooted, you can move them to a bigger pot or into the garden. It’s always best to allow a little time for your plant to get accustomed to being out of the enclosed system. Take the plastic bag off after eight weeks and let the plant sit in its pot, and drink in the fresh air for a few days. Then move the pot to the location you want to replant the hibiscus aethiopicus to; this will likely be a sunnier location. Leave it in the pot in the new location for a day, and then you’re good to replant or repot it.
Root Cuttings
Root cuttings are slightly more tricky to harvest because you need a relatively thick piece of root to get it right. You’ll also need to trim the roots down so that they are encouraged to grow more and so that they fit into a rooting pot. You’ll use the same rooting soil combination mix as with stem cuttings, but you won’t need to use a plastic bag.
Root cuttings are quite literally just a root system. You will leave behind the base of the stem or trunk that the roots connect to, but the most significant portion of the stem or trunk will be removed. Your roots should be trimmed to a radius of around 3-4 inches. Individual root growths should not exceed 6 inches. Cutting down any more than the prescribed 3-4 inches can result in death because the plant won’t have a strong enough root system to support further growth.
Unlike stem cuttings, root cuttings are planted completely under the soil in your rooting pot. The crown of the plant, in this case, the highest point of what’s left of the stem or trunk, should be just below the soil’s surface. You’ll need to keep the soil moist but not completely wet.
Once new shoots have at least five nodes, you’ll want to pinch the top node off of each shoot. This will encourage more voracious growth with new shoots and result in a fuller shrub with more dense foliage. You can pinch the nodes again once more develop if you want the plant to branch out more.
Potting Season
Potting season is arguably one of the most exciting times of the year. Whether you are simply growing your hibiscus aethiopicus in a pot to have it inside or on your porch or balcony, or whether you are carefully cultivating a bonsai, you’ll likely need to repot your plant every now and again.
There are two main reasons why we repot plants; Either to give the plant’s roots more room to grow or to provide the plant with fresh nutrients as these can become depleted entirely over time.
Bonsais are repotted reasonably regularly to prevent the little beauties from becoming pot-bound or root-bound and eventually starving to death. Bonsais become pot-bound when their roots spread into thick carpet-like structures to search for nutrients in the depleted soil. Eventually, the roots take up all the space that was occupied by fertile soil and effectively become stuck in their pot.
The best time to pot or repot your hibiscus aethiopicus is late into spring or in the early summer months. During these seasons, conditions are the most suitable for hibiscus aethiopicus to thrive. They have access to the warmth, light, and rich soil they need to grow. The longer days in spring also mean they have more daylight hours to bask in the sun and photosynthesize. The extended hours of sunlight also replicate the grassland conditions quite well by raising the temperature of the soil and the air around your Hibiscus.
Take some time to examine your plant before you repot it. It’s best to ensure that there aren’t any critters feeding off your plant’s roots that you’ll transplant into a new pot. Also, take care to transplant your hibiscus aethiopicus into a new pot with some of its soil from the old pot. This will decrease the plant’s adaption time to its new home.
When repotting a hibiscus aethiopicus bonsai, you’ll likely need to trim the roots back a little. Be careful not to take too much off the roots, though; you dont want to disturb the plant and cause it to struggle. Also, take care not to disturb the dominant roots too much; these will be thicker and sometimes longer than the rest. These are the bonsai’s principal apparatus for extracting nutrients from the soil.
Shaping and Pruning
As a shrub, hibiscus aethiopicus doesn’t require a lot of pruning or shaping unless you want to turn it into a topiary in the shape of a duck. So, this bit applies mainly to those interested in growing hibiscus aethiopicus as a bonsai. Then again, this is The Bonsai Alchemist, and you are here to learn more about the serene art of bonsai, so let’s jump straight in.
The optimal time to prune your hibiscus aethiopicus is in spring. This is at the onset of the growing season. It’s always a good idea to shed the tree of old-growth before the new comes in. Similar to your roots, you don’t want to take too much off the tree, though. In general, it’s recommended to clean up the base of the tree and remove any leaves and branches that are growing out of place and detracting from the tree’s beauty.
Remember that every piece of a tree exists to serve a purpose. By taking too much of any of these vital structures away from the tree, you are depriving it of nutrients and the ability to sustain itself. Shaping and pruning your bonsai isn’t just about how the tree looks; it’s also about the tree’s health.
You might want to prune once more in late autumn; this is when the growing season comes to a close. Sometimes, it’s good to clear the tree of any excess leaves, particularly around the base or on branches that are usually bare, as this will allow the tree to push more nutrients into conserving the fresh growth in desired places.
When it comes to shaping, there are numerous styles that are widely accepted for hibiscus bonsais. Because of the location these humble beauties naturally grow in, you might want to take a look at some of the accepted South African bonsai styles. The thick trunk hibiscus bonsais can develop works beautifully with these styles. South Africa is the only country in the world to have its indigenous bonsai styles endorsed and accepted by the Japanese bonsai masters.
Here is a list of a few of the bonsai styles we recommend for this beautiful plant:
Chokkan – Formal Upright Style
Arguably one of the most popular styles of bonsai, chokkan dominates the bonsai world with its robust and resolute trunk and gently tapered tall proportions. Hibiscus aethiopicus brings a slight twist to the chokkan style, but with branches that can be developed into thick trunks reasonably easily, it’s a winner nonetheless.
Hokidachi – Broom Style
Broom bonsais are grown with thick trunks, which hibiscus easily develops as a bonsai. Atop the girthy trunks, the carefully styled branches spread out in all directions, growing steadily upward as they do so. This forms a tree crown resembling the head of a broom.
Smaller flowers like those that hibiscus aethiopicus produce are perfect for this style of bonsai cultivation, as is the slightly more delicate foliage of this specific species.
Kengai – Cascade Style
Kengai is a representation of the challenges a tree faces in nature when growing on a steep cliff. The tree’s location causes it to bend downward due to falling rocks or snow or any number of other factors. Hibiscus aethiopicus has narrow stems that can be trained into malleable branches, making it the perfect plant to grow as a kengai bonsai.
Allowing the tree to flower below the rim of the pot also creates immense visual interest and a feel of thriving in adversity. Kengai is typically grown in taller pots, adding stability to the bonsai while also allowing the root system to develop correctly. For perfect balance, we suggest training the branches to grow horizontally once they’ve curved downward sufficiently.
Bunjingi – Literati Style
Because these trees thrive in densely populated areas, they must grow taller in order to survive in fierce competition for resources. Since the sun only shines on the top of the tree, the trunk grows crookedly upward. The bark is usually stripped from the branches to make them appear more robust and weathered. In this way, it is implied that the tree is struggling to survive. The majority of literati bonsais are grown in small round pots.
Shakan – Slanting Style
The shakan bonsai style seeks to emulate the thrashing effect of gale-force winds on trees. Growing a hibiscus aethiopicus bonsai in this manner results in a miniature tree that has a considerable slant. In nature, trees exposed to the harshness of strong winds tend to grow foliage in the direction of the winds; this lessens the change of branches being flung from the trees. Shakan bonsais are grown with their foliage predominantly flourishing toward one direction. Overall balance is struck by the roots that both stabilize the bonsai and create visual equilibrium.

Pests and Diseases
The list of pests and diseases that express fondness for hibiscus aethiopicus is long. We’ve compiled this next section to make identifying and combatting these organisms and infections a little easier. We’ll tell you what these organisms look like, where to look for them, what damage they typically cause, and give you options on how to get rid of them.
Some are more serious than others and require much more intense methods of extermination, but to make this as easy for everyone as possible, I like to include methods suited for the regular relentless bug killer and the insect lover alike. Sometimes it’s enough just to deter these creatures. They are, after all, an essential part of the intricate tapestry that is the natural world.
Aphids
Aphids are one of the familiar creatures you might find on your plants. Most of us have had to deal with an aphid infestation before. Aphids are incredibly interesting pests. Through evolution and a fight to survive in the modern garden, aphids no longer require the male of their species for reproduction. Eggs are fertilized within the bodies of unborn female aphids so that when the new generation of aphids is born, they’re already pregnant and about to give birth themselves. Aphids are, therefore, one of the fastest spreading organisms in the garden.
As they decimate your hibiscus and grow, some aphids develop wings and move on to new plants to continue their colonization.
Apids are very small, typically reaching only around ⅛ inches long (2-4mm). They come in a variety of colors, sometimes corresponding with the dominant color of your plants. They can be challenging to spot if you don’t look close enough, but sometimes their color is striking, like red, black, or snow white. They have tiny, almost oval bodies, and they feed by sucking your hibiscus aethiopicus dry of all its nutrients and vital sap.
Because aphids feed off your plant’s nutrients, the leaves of your hibiscus aethiopicus take the brunt of the damage. You might notice significant yellowing, either in spots or patches or even the edges of the leaves. With a severe enough infestation, the leaves could even turn brown in some places and die completely. Your leaves could also curl at the edges and become dry and brittle due to a lack of nutrients.
There are a few tried and trusted methods for getting rid of an aphid infestation:
- Water
You can hose your plant down gently or wash it by hand. You won’t want to use a pressure hose as this will damage your plant more than the aphids have. Typically this method is for younger infestations that haven’t quite caused significant damage to your plant yet. You’ll need to hose your plants down every few days until the aphid infestation clears. The infestation could take up to two weeks to disappear entirely,
- Homemade Spray
Soapy water in a spray bottle works wonders. Dissolve a few teaspoons of dish soap in a bottle of water and apply liberally to your plants. Coat the leaves and stems of your hibiscus aethiopicus well and repeat the process every few days until you can’t see any more aphids. This works particularly well because the soapy solution reacts with the soft matter holding the aphids’ bodies together and neutralizes them completely. At most, the aphids become nutrients for the organisms that help your plants thrive.
- Pesticide
Pesticides that contain ingredients like Imidacloprid are your best friend and often last resort with aphids. This is one of the critical ingredients in pesticides that are effective against aphids and actually exterminate them in their entirety. They’ll be your best friend for another reason too. Unlike some pest control methods and systems, Imidacloprid won’t harm your garden’s pollinators. This means bees, butterflies, and hummingbirds are left unaffected and are free to continue propagating the beautiful flowers of your hibiscus aethiopicus.
Caterpillars
Caterpillars are small, often slightly fat, worms. Usually, they are green, but a great many caterpillars come in other colors; some even have intricate patterns adorning the various segments of their bodies. If you’re looking for caterpillars on your plants, look for their little dark heads or their long fat bodies. You can also look for bite marks in the leaves of your hibiscus aethiopicus and, alternatively, their excrement or eggs. You might find that your leaves are rolled or webbed at the edges as well; this is usually a good sign that you have caterpillars.
Caterpillars are an excellent food source for many other organisms; this means they’re relatively low on the food chain. This also means that caterpillar populations are usually controlled fairly naturally by other insects, birds, and even small mammals. When there’s a decrease in the population of the usual predators caterpillars have to deal with, caterpillars immediately become an enemy to your garden.
Caterpillars are sometimes trickier to get rid of. The prime reason for this being not many people believe caterpillars should be exterminated or starved by preventing them from snacking on your plants. This is primarily due to the fact that caterpillars sometimes turn into butterflies after pupation. It’s more than understandable that the idea of exterminating future pollinators and beautiful dynamic showpieces in the garden fills some garden lovers with trepidation.
The fact remains that caterpillars are voracious feeders and, given a chance, can destroy your garden and reduce it to dry dead stalks of once vibrant lush flora. Your hibiscus deserves far better a fate than that. After all, insects might be necessary to plants, but plants hold more importance to humans because of the vital oxygen they produce. Allowing a caterpillar to decimate a thriving and essential plant goes against the natural order and our primal survival instinct.
The takeaway from this is not to find every last caterpillar in your garden and send it to the hereafter. I am merely giving you the information you need to decide for yourself how to move forward if a caterpillar is wreaking havoc on your hibiscus. The rule of thumb is that if a caterpillar is doing minimal damage, you’re okay to leave it be, or alternatively move it to a plant that isn’t a statement piece hibiscus. If your plant is on its way to struggling to survive because of a caterpillar infestation, they have to go. How do we make this happen?
- Hand Picking
Often the best way to get control of your caterpillar infestation is to pick them off by hand. This way, you don’t use any chemicals that could destroy your plant, and you can keep track of what the density of your infestation is. You’ll also have more control of which caterpillars you pick off, and you have the option of placing the caterpillars down away from your garden or enacting any other conservationist method if you so do wish.
- Spray Solution
A spray bottle containing soap and water is as good a solution to a caterpillar problem as any. Spraying your hibiscus with a solution of soap and water makes the plant’s leaves and stems too slippery for caterpillars to cling to. Soap also messes up the metabolism of soft-bodied insects and causes the thin waxy outer layer of their bodies to dissolve, thus seeping out their nutrients and killing them.
- Destroy the Nest
This is an incredibly effective method when done right. Caterpillar nests are small hanging structures found on trees and shrubs, like your hibiscus aethiopicus. Your best course of action, no matter which method you choose to employ to get rid of the caterpillars on your plant, is to clear the nest out and destroy it. It would be somewhat pointless to clear your plants of caterpillars but leave the nest up and churning out more caterpillars.
The best time to destroy the caterpillar’s nest is either early in the morning or late in the evening, as this is when most of the caterpillars will still be inside. Once you’ve taken the nest down, put it into a bucket of warm soapy water to get rid of the rest of the caterpillars inside.
- Bacillus Thuringiensis
This is a naturally occurring bacteria found in soil that poisons caterpillars and kills them without you having to. Bt is easily found and readily available in liquid and powder form on the shelves of most general-purpose and garden stores, and you’ll probably find it in the gardening section of your local hardware outlet.
Bt is essential a natural poison that obliterates the lining of caterpillars and other soft-bodied pests and kills them within a few days. Bt is non-toxic to your vital pollinators, so bees, butterflies, and hummingbirds are all safe. It’s also not toxic to humans or pets, so there’s no harm in coming into contact with it. You’ll need to reapply Bt to your plants in cases of extremely hot weather or rain as the sun and rainfall can neutralize Bt.
Ants
Ants are mysterious creatures. In contrast to other pests, they rarely feed directly off your plants, but their industrious efforts often deprive plants of nutrients and any means of acquiring them. It is possible for ants to build vast colonies under your garden that can disrupt root growth and even suffocate already developed root systems.
Ants aren’t altogether useless, though. In addition to softening the soil, the colonies they build and the pathways they weave around them provide better air circulation and water drainage when they are not focussing their efforts on the ground directly below your hibiscus. This is actually incredibly beneficial to plants like hibiscus because they thrive in well-draining soil.
Interestingly, ants can farm smaller organisms, such as aphids. Aphids and ants have an interesting, mutually beneficial relationship that protects both species in various ways. When an aphid breaks down the organic material in your hibiscus, it releases a sticky substance called honeydew. The aphids provide the ants with an almost limitless supply of honeydew, a delicacy in the ants’ eyes. Consequently, the ants protect the aphids from other organisms that would otherwise destroy them. This is the reason you may find ants crawling up and down your plant’s stem; they’re likely collecting honeydew and protecting aphids.
Ants are very interesting creatures, but in the context of this article, they are still pests. So what can be done about them?
- Control the Aphid Population
Aphids attract ants. If you have an ant problem, you likely have an aphid problem too. If you can get control of the aphid population, you might rid your garden of ants. This method won’t obliterate every ant in existence, but it will scale back the ant population to a more manageable density, one that is good for the garden and balanced out by the presence of other organisms.
- Sugar
You can use sugar and some sugar substitutes to draw ants away from your plants. However, unless you have this linked to some kind of extermination tactic, all you’ll be doing is giving ants more places to find sugary sweet substances in your garden. Some gardeners say that a small deep bowl of sugar water is enough to attract and decimate ants, but it takes a long time for ants to drown because of their physiological makeup.
- Borax
Your sugar solution will likely be made deadly by borax or boric acid. You should use caution, as borax is toxic to both humans and pets. Make sure you wear gloves when handling it. Ingestion of borax can cause nausea, vomiting, and diarrhea. Large doses of this toxic compound can lead to shock and kidney failure. Inhaling borax can harm your nose, lungs, and throat. It can also cause irritation to your eyes and skin.
With the damage that borax can cause to humans, it’s easy to imagine how deadly it is to little critters like ants. Borax is corrosive and disrupts critical ant infrastructure, including their digestive systems, when ingested. In the end, the ant’s internal structure is completely disrupted, causing it to die. Nevertheless, there is a certain beauty to the way borax is suited for use as ant poison.
It is important to understand ant society in order to understand the efficacy of borax. It is important to remember that the insects that wander up and down your hibiscus are only a small component of the entire social system of the industrious ant. These insects are the scouts. Their job is to collect food from the world and bring it back to the nest. They are also the ants that engage in aphid farming, something that they are very good at.
A whole other world of ant societies lies deep within the earth, under your hibiscus, and deep within annoying ant mounds. Of particular note is the queen of ant colonies, who lays her eggs beneath the earth. In addition, you have the reproductive ants, as well as the vast underground network of worker ants.
Borax is critical to getting rid of both surface wanderers and the hidden world of ants. As we discussed above, ants do not consume everything they find on the surface of the ground. Some are consumed for energy, but the bulk of what they collect goes to the queen.
The scouts can get deep into the belly of the beast before inflicting the final blow due to borax’s slow-acting nature. Thus, surface scouts unwittingly commit mass genocide on their entire nest by inadvertently using borax.
- Diatomaceous Earth
Unlike borax, diatomaceous earth doesn’t pose horrendous health risks. Food-grade diatomaceous earth is a compound derived from the fossilized remains of hard-shelled algae called diatoms. Due to its food-grade nature, it is completely safe for humans to interact with, and it will not harm dogs or cats. However, it is extremely harmful to ants.
Diatomaceous earth is a powdery substance that dehydrates ants. Also effective against slugs and cockroaches, this slow-acting solution has other advantages besides just protecting your hibiscus. As a slow-acting substance, diatomaceous earth will take some time to eliminate your garden of ants altogether, but it keeps them under control if used regularly. In like manner with borax, diatomaceous earth also helps to take care of the entire nest by giving the ants above ground time to get to their nests beneath the surface.
- Spices
Consider covering your hibiscus with a spicy substance. The best products for this are ground cinnamon, cayenne pepper, and chili powder. Although these aren’t harmful to ants, sometimes that isn’t the objective. This is a suitable solution. Have a deep hatred for the ant population and simply wish to keep your hibiscus safe.
- Hot Water
An important factor to consider with ants and water is how long they take to drown. An ant can take 24 hours to drown fully. This is due to the ant’s biology. The ant is one of the oldest creatures living on this planet; it thrived during the time of the dinosaurs. Survival of cataclysmic events like the great dying would probably induce some kind of mutation and evolution so that an organism is less likely to die. And it has.
An ant’s body is coated in a thin film of oil that protects the structural integrity of all its biological parts. Having an oily residue keeps the ant’s exoskeleton safe, and keeping the exoskeleton safe keeps the ant’s soft inner matter safe, and in that way, the ant is one tough little bugger.
By adding soap to your water solution, you can avoid this neat little evolutionary trick. By neutralizing the oil, the soap will allow the ants to drown much faster. As for sugar or aspartame, you really don’t need to pour copious amounts into the solution to attract the ants as they enjoy the occasional drink of water. If you leave water in your cup or the kettle, you’ll likely find ants floating in it.
In the end, pouring hot water directly down the hole in the top of the ant mound will take time and will be largely ineffective. Even boiling water will cool rapidly upon contact with the soil when it touches it, so it has the same underwhelming slow drowning effect as room temperature water.
Water can, however, disorient ants and prevent them from returning to their nest while you take care of the queen using other methods. Due to the pheromones they exude, ants form long lines and queues. By using these pheromones, other ants can follow a breadcrumb trail back to their nest. By pouring soapy water along the ant trail, you will neutralize the pheromones, which will prevent the ants from finding their way home.
Grasshoppers
The grasshopper is a cleaner. In nature, they are one type of organism that decomposes dead debris. In the grand scheme of things, they hold enormous significance, and like most cleaners, their waste provides essential nutrients for new growth and other organisms. The grasshopper spends its entire life moving around, allowing decaying biological matter to be broken down and leaving behind a fresh source of food for plants. Their decomposition by other cleaners becomes an important part of the process they work so hard to propagate after they die.
In many cases, grasshoppers do not focus all of their deconstruction efforts on dead or dying biological matter. So the fact that your hibiscus aethiopicus is alive and thriving is of no consequence to grasshoppers. The grasshopper performs one critical function. It breaks down organic matter, excretes nutrients, and moves on. They spend their entire lives doing that. At every phase of their lifecycle, nymphs, as well as adults, they will destroy as much lush, green biological material as they can.
Summer is when grasshoppers lay their eggs. As a result of diapause, the eggs are buried in pods beneath the soil throughout the winter. In the spring following the egg-laying season, nymphs hatch and begin working. Nymphs feed on plant matter to survive. To reach adulthood, nymphs require nourishment. In terms of green plants, however, they eat anything and everything indiscriminately.
The nymph destroys fertile land where it was born and then moves on to new pastures with the intention of turning them into a desolate wasteland after having exhausted its former food supply. Grasshoppers do this their entire lives until the winter arrives, and they turn into lifeless husks.
The best way to deal with grasshoppers is to prevent an infestation in the first place.
- Flowers
If you are a fan of plants, this will excite you to no end. Grasshoppers find a great deal of plants and flowers to be repulsive. By filling your garden with flowers, you will be able to keep grasshoppers away from your turf in a more humane way. Would you believe it could be so simple? In this regard, dianthus, lilac, salvia, crepe myrtle, and artemisia are some of the most beneficial flowers.
It’s also a good excuse to get started on a juniper bonsai for the garden since grasshoppers hate juniper. Despite the fact that its berries are used in some of the best gins, the days of juniper favored purely for libations have passed. Grasshoppers hate other plants as well, such as forsythia, lantana, and moss roses.
- Garlic Spray
Grasshoppers detest garlic. So spraying it on your hibiscus aethiopicus is extremely effective against them. A garlic solution applied to your hibiscus is the best way to keep grasshoppers from using your plants as a food source. The garlic spray we highlighted earlier is perfectly suited for grasshoppers.
- Pepper Wax
As with garlic spray, pepper wax spray works as a deterrent rather than being harmful. Spraying pepper wax spray around your hibiscus plants creates a barrier that critters do not want to enter, just like sprinkling chili powder or ground pepper around your hibiscus.
- Neem Oil
Neem oil is extracted from an Australian tree and is a powerful insect repellent. Neem oil does more than just repel grasshoppers from your hibiscus; it can also slow down the rate and amount of grasshopper egg-laying. In other words, you are able to slowly decrease grasshopper numbers over time and eventually eliminate them completely through the use of neem oil.
- Nolo Bait
Regardless of the stage of grasshoppers’ lives, Nosema Locustae infects and obliterates them. Nolo bait contains these organisms, which can cause havoc on grasshoppers for generations.
Spread the product once the grasshoppers hatch and become nymphs for the best chances of success. Ingesting the organisms will cause them to move through the grasshoppers’ internal structures and poison their blood. Due to their nature as cleaners, any remaining grasshoppers will eat the dead ones, becoming infected themselves. A single grasshopper infected with the disease is enough to continue the cycle of death and destruction, protecting your hibiscus aethiopicus in the process.
Earwigs
As a result of the sweltering heat and humidity we experienced in June 2021, the population of earwigs grew to an all-time high. Those conditions were ideal for the insects to thrive. When it comes to your hibiscus aethiopicus, earwigs can either be a friend or a foe.
Earwigs have an important role in your garden because they are omnivorous organisms that eat other organisms and keep them in check. Therefore, seeing a few earwigs on your property or even scurrying past your hibiscus aethiopicus shouldn’t bother you. It is when they swarm that they become a problem. But even swarms of earwigs can’t hurt humans. So what kind of damage can they do?
Grasshoppers and earwigs are both insects of the biological matter cleaner category. Likewise, they are also designed to remove decaying plant material and make way for new growth and provide it with nourishment. Nevertheless, just like grasshoppers, they will eat your healthy plants if there is no decaying plant material around.
The earwigs like ornamental plants like hibiscus aethiopicus but will attack your fruits and vegetables as well. These insects chew irregularly shaped holes into your plants’ leaves. Your hibiscus aethiopicus cannot photosynthesize without leaves, so attacking its leaves is as bad as destroying the entire plant. If you do find an infestation of these organisms, you can get rid of them by using the following effective methods.
- Keep Your Garden Dry
Earwigs prefer moist environments. The first step you should take if you notice a large number of earwigs in your garden is to check if you have any moist patches of mulch that may be attracting them. In many cases, drying out your garden is all that’s required. In any case, Hibiscus aethiopicus dislikes wet soil, so it may be wise to keep the soil relatively dry between waterings for the plant’s protection.
- Bait
You can build a homemade trap using damp newspaper or toilet rolls. Earwigs are only active at night. They spend the day seeking warm, moist spots to rest. It is likely that you will find many earwigs hiding within the moist pages of the newspapers the following morning. If you are having trouble attracting any, try adding some bran or oatmeal.
You can also attract earwigs with tuna or pet food cans containing vegetable oil. They’ll latch onto the oil as a food source, so you’ll be able to get rid of vast numbers of them each day.
- Sticky Substance
Making sure they can’t get to your hibiscus is one of the easiest ways to keep earwigs at bay. Various products can be used for this purpose. There are many good options like sticky tape, petroleum jelly, and Tanglefoot. You just need something sticky. Don’t use something sweet in case another pest is accidentally attracted by it.