How to Drill Drainage Holes in Ceramic Pots
There are racks and racks of beautiful pots in every shape, size, and color in almost any thrift store, general dealer, online shop, or garden center. I’m sure you have stood in front of such a pot display and imagined a gorgeous tree nestled in one of them. Then when you get your trophy back home, you find it has no drainage holes in the bottom, so it gets consigned to the cupboard.
Almost all of these pots are made to be multi-functional, so they lack the drainage holes that are so vital to the bonsai enthusiast. Drilling drainage holes into ceramic, terracotta, pottery or glass pots is a simple task, and the fact that the pot has no holes in the bottom should not stop you from purchasing it. Here’s our guide on how to drill drainage holes in ceramic pots.
Why drill holes into Ceramic, Terracotta, or Glass Pots?
It’s not necessary to buy expensive bonsai pots to house your trees. There are beautiful pots available from many places, and all they lack is drainage holes.
Follow our simple step-by-step guide to drilling drainage holes into the pots.
Equipment you will need
Before you can start drilling, there are several pieces of equipment that you will need:
- Drill
You will need a drill that can drill without hammer action. Also, the drill must be able to have the speed turned down so you can work slowly. A cordless drill is ideal and can be purchased from Amazon for less than $50.

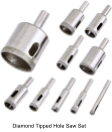
- Diamond Tipped Hole Saws
You will need a set of diamond-tipped hole saws. Even though they have the word diamond in them, these are not expensive items. They are available from Amazon, but irrespective of the country in which you live, you should be able to find these in any good hardware store. They generally come in packs containing several different sizes.

- Water
You will need water to provide lubrication and cooling. Some people use a simple sponge to dribble water over the saw while drilling.
The best thing is to take a plastic soda-pop bottle with a lid. Take a large needle and poke a hole into the bottle about an inch up from the bottom. Fill the bottle with water and tighten the cap. The water will no longer squirt out of the hole as you tighten the lid. When you are ready to drill, loosen the cap so the stream of water starts again, and direct it onto the saw. This will wash away the dust while drilling and provide the necessary lubrication and cooling. When you have finished drilling your hole, tighten the cap to stop the flow.
- A rubber mat or old bath towel.
You will need these to keep the pot in place and protect the top. As you turn the pot over, you do not want the lip to be rubbing on a hard surface. Not only could you damage the lip of the pot, but it will also slide around while you are working. A soft towel or rubber mat will keep the pot steady while working.
- Eye, ear, and hand protection.
You should wear clear eye protection while working with a drill, and if you have many pots to drill, it would be a good idea to wear ear protection. Also, wear gloves to protect your fingers from sharp edges.

- Magic Marker and Masking Tape.
A Magic Marker to mark where you intend to drill holes.
Steps for How to Drill Drainage Holes in Ceramic Pots
Step #1: Preparation
Gather all the equipment you will need and place it on a surface that is at a comfortable height. Remember that you will be drilling downwards, so the surface should not to too high.
Step #2: Marking the Holes
Place the pot upside down on the towel and mark where the holes will be drilled with a magic marker. Put on your safety glasses, gloves, and hearing protection.
Step #3: Preparing the Drill
Select the appropriate saw size. For most pots, a ½” or ¾” (1½ – 2cm) size will be sufficient. Insert the saw into the drill, tighten the chuck, and ensure the drill speed is turned down. You are looking for a slow speed as you want the diamond tip of the saw to grind away at the pot as it “eats” its way through the bottom.
Step #4: Making the Holes
It can be challenging to hold the saw in place as you start, so angle the saw at a 45° angle and hold the drill tightly to hold it in place. If the saw skips and slides as you start, stick a piece of masking tape onto the pot. This will keep your saw in place as you start. Once started, you can pull the tape off.
Direct your water spray onto the pot and start drilling slowly while applying firm pressure. This will cut an arc into the pot. When you can feel the arc, slowly stand the drill up straight while using firm pressure (but don’t lean all your weight onto the drill), allowing the diamond-tipped bit to do its work.
Tip: Don’t leave the saw at 45° for too long. If you keep it there for too long, you will cut oblongs into your pots and not round holes. You just want an arc to be cut to stabilize the saw as you slowly move it perpendicular to the pot.

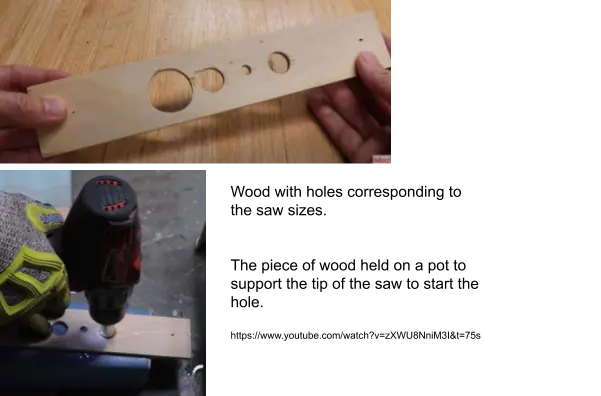
There is an excellent alternative for the drill placement on the pot. I saw this method in a YouTube video where the author (Chris Notap) used a piece of wood in which there are holes that correspond to the sizes of the holes that can be drilled into the pots. He placed the piece of wood across the bottom of the pot and then inserted the saw into the correct size hole in the wood. He then held the wood piece, which supported the drill as it started to make a hole. Once the hole was started, he removed the piece of wood and finished drilling.
Step #5: Cleaning
Wipe the bottom of the pot clean.
Final Thoughts
Every bonsai deserves to live in a beautiful pot, but they can be expensive and could be beyond the reach of many enthusiasts. Search thrift shops, garage sales, junk shops, and garden centers for pots, and if they have no holes, it is not a show stopper as you can have that sorted in a jiffy.
Drilling holes in ceramic, glass, or porcelain pots is straightforward and can be done by anyone. Follow our simple step-by-step guide for how to drill drainage holes in ceramic pots, and in no time, you will have a lovely range of pots from which to choose for your trees.


